SLIDER

individual queen of puddings

30 Aug 2021

We've been in lock down in Sydney for a very long time. As part of my self care routine, I made the decision to prepare myself nice evening meals and some times that meal includes a pudding.

I normally avoid puddings and have fruit and yoghurt for dessert but these are strange times. In a recent column for the Guardian, I found a Nigel Slater for a queen of pudding which had a layer of citrus curd rather than the traditional berry jam. 


I think I last made a queen of pudding when I was about 16. It's a traditional British pudding - egg custard thickened with fresh breadcrumbs or cake crumbs, topped with jam then a layer of frothy toasted meringue.

Apart from the cream, I had everything else I needed to make the pudding. I turned to a British stalwart, Delia Smith, for the base recipe which I then adapted. The citrus curd layer sounded like a great idea but so did the jam, so instead of a single pudding I made 4 individual puddings. I split the difference and I made 2 puddings with jam and 2 with the curd. I used homemade raspberry jam that was already in the fridge and made a small batch of lemon curd but of course you can use good quality shop bought.


Here's the recipe for you which I adapted from a Delia Smith recipe. The recipe makes 4 small puddings but you could also make one larger pudding. The larger pudding may take a little longer to set. For all my recipes I use a 250 ml cup, a 20 ml tablespoon, unsalted butter and 60 g eggs. My oven is a conventional oven so if you have a fan-forced oven you may need to reduce the temperature by 20°C.


Individual Queen of Puddings - makes 4 
190mls full fat milk
190mls cream
10g butter, plus a little extra for greasing
35g (2 tbs) caster sugar
grated rind 1 small lemon
2 eggs
75g fresh white breadcrumbs
35g (2 tbs) caster sugar, plus 1 level teaspoon extra
½ cup berry jam or lemon curd
 
Lemon curd
1 egg
50g caster sugar
80mls fresh lemon juice
2 teaspoons finely grated lemon rind
Pinch salt
45 g unsalted butter, chopped at room temperature
 
Microwave lemon curd
Whisk the egg, sugar, lemon juice, lemon rind and salt in a microwave-safe glass bowl until combined. Cook on low in the microwave for 3-4 minutes stirring every minute, or until a smooth, thick curd forms.

Sieve the curd to remove any eggy bits and lemon rind. Set aside to cool a little before stirring in the unsalted butter. Allow the curd to cool completely before storing in the fridge in an airtight container. 
 
Pudding
Pour the milk and cream into a small saucepan and bring to the boil. Remove from the heat and stir in the butter, breadcrumbs, 35g caster sugar and the lemon rind and leave for 20 minutes to allow the breadcrumbs to swell.

Pre-heat the oven to 180°C. Grease four 175 ml individual oven-proof dishes with butter and place on a baking tray. 
 
Separate the eggs. Put the whites into a large, grease-free bowl and the yolks into a small bowl. Beat the yolks and add them to the cooled breadcrumb mixture then divide the mixture evenly between the individual dishes, smoothing the tops. Place the tray in the centre of the oven and bake for about 20 minutes at 180°C until just set.
 
Meanwhile, if using jam, melt it in a small saucepan over a low heat. You can also do this step in the microwave. Omit this step if using a citrus curd. When the puddings are cooked, remove them from the oven and spread the jam or curd carefully and evenly all over the tops. You’ll need about 1-2 tbs of jam or curd per pudding. Beat the egg whites to the stiff-peak stage, then whisk in the additional 35g caster sugar to form a meringue.
 
Divide this meringue mixture evenly between each pudding, piling it up into high peaks or you can pipe the meringue if you prefer. To pipe the meringue, spoon the meringue into a piping bag with a 1.5 cm nozzle. Pipe the meringue over the puddings working from the outside-in, until the jam is completely covered. Finally, sprinkle a teaspoon of caster sugar over the tops of the puddings and bake for a further 10-15 minutes on the centre shelf again until the tops are golden brown.
 
 
Ideally serve while warm but they reheat well in the microwave on a medium to low setting.
 
It was nice revisiting an old favourite and discovering both versions were equally delicious.
 
Anyway, see you all again next week with some more baking from my kitchen.
 
Bye for now,
 
Jillian


PRINT RECIPE

soft and pillowy cinnamon buns

22 Aug 2021


I first heard about Sarah Kieffer's award winning cinnamon bun recipe quite some time ago. I wasn't planning to make a batch though. These were supposed to be passionfruit custard scrolls but something went awry with the custard and I needed to change plans very quickly to prevent a custard disaster in my kitchen.


I scraped the custard from the dough; rechecked Sarah's recipe and thankfully had all the ingredients I needed for the filling and cream cheese icing and a few hours later I was taking these pillowy cinnamon rolls out of the oven.


Sarah's dough is a no-knead recipe which means the dough has a high liquid content and relies on folding done in the bowl rather than kneading followed by a sleep overnight in the fridge. It's a technique I use quite often but if you need any instructions Sarah has a GIF on her blog demonstrating the technique. 
 
 
Once the buns come out of the oven they're slathered with some of the cream cheese icing. The rest is applied once the buns cool down.


True to her word, these are the lightest, fluffiest cinnamon rolls I've ever made. Maybe it was massaging the dough with custard that did the trick? I thought the buns might be overly sweet but they're not at all and they're so delicious I just had to share the recipe with you. 


Here's the recipe for you which makes 8 enormous cinnamon rolls. For all my recipes I use a 250 ml cup, a 20 ml tablespoon, unsalted butter and 60 g eggs. My oven is a conventional oven so if you have a fan-forced oven you may need to reduce the temperature by 20°C.

Soft and pillowy cinnamon rolls - makes 8 large buns which are best eaten the day they're made. The recipe was adapted from The Vanilla Bean Blog

Dough
2 large eggs room temperature 
90 mls milk, lukewarm
30 mls honey
1 tsp vanilla extract 
2 cups (300g) plain flour 
1 slightly heaped tsp of dried yeast 
½ tsp salt
75g room temperature unsalted butter, cut into small pieces 
 
Filling 
1/4 cup (50g) packed brown sugar
2 tsp ground cinnamon 
Pinch salt 
15g unsalted butter, melted and cooled 
Icing
60g unsalted butter, room temperature 
60g cream cheese, room temperature
1/2 tsp vanilla bean paste 
Pinch salt 
½ cup icing sugar, sifted 
 
Dough
Grease a large bowl. Combine the eggs, milk, honey and vanilla in a large liquid measuring cup. In the bowl of a stand mixer fitted with a paddle, mix the flour, yeast and salt and stir on low to combine. Add the egg mixture and mix on low to combine. With the mixer on low, add the butter, one piece at a time. When all the butter has been added, increase the speed to medium and beat the butter into the dough, until all the little butter pieces are incorporated, 1 minute. Transfer the dough to the prepared bowl. The dough will be very sticky and you will need a spatula to scrape the dough into the bowl. Cover the bowl with plastic wrap and let rise for 30 minutes.
 
Place your fingers or a spatula underneath the dough and gently pull the dough up and fold it back over itself. Turn the bowl and repeat this folding again. Continue 6 to 8 more times, until all the dough has been folded over on itself. Re-cover the bowl with plastic and let rise for 30 minutes. Repeat this series of folding 3 more times, for a rise time of 2 hours and a total of 4 foldings. Tightly cover the bowl with plastic wrap and refrigerate overnight or up to 72 hours.
 
To Assemble
Flour a work surface and knead the dough 10 to 12 times to activate the gluten. Shape the dough into a ball, cover the top lightly with flour, and cover with a tea towel and let come to room temperature
 
Grease and line a 26cm round pan with baking paper and set to one side. In a small bowl, mix the brown sugar, cinnamon, and salt. Roll the dough into a 8 by 12-inch rectangle. Brush the dough with the melted butter and sprinkle the cinnamon-sugar mixture evenly over the top, pressing it lightly into the butter so it adheres. Starting at a long side, roll the dough into a tight cylinder. Pinch the seam gently to seal it and position the dough seam side down. Use scissors or a sharp knife to cut the dough into 8 equal pieces. 
 
I tucked any loose ends underneath before I transferred the rolls to the prepared pan placing them cut side up. Cover the pan loosely with plastic wrap and let the dough rise until doubled, 1 to 1 1/2 hours. 
 
Preheat the oven to 180ºC, conventional. Remove the plastic and bake the rolls for 25-30 minutes on the centre rack or until the rolls are golden brown, rotating the pan halfway through. While the rolls are baking, prepare the icing. 
 
Cream cheese icing
Place the butter, cream cheese, vanilla and salt into a medium size bowl. Using a hand beater, mix on medium until smooth and creamy. Add the icing sugar and mix on low until combined. Scrape down the sides of the bowl and mix on medium until the icing is light and fluffy, 3 to 4 minutes. 
 
When the rolls are ready, transfer the pan to a wire rack and let cool for 5 minutes. Using an offset spatula or table knife, apply a thin layer of the cream cheese icing, using about one-third of the mixture. Let the rolls cool for another 15 to 20 minutes then top with the rest of the icing and serve.
 
If you’d like to make overnight cinnamon rolls then prepare the rolls (roll out dough, fill them, roll them up, cut them, and put them in the prepared pan) then cover them loosely with plastic and refrigerate for up to 18 hours. When ready to bake, preheat the oven, and let the rolls sit at room temperature (still covered in plastic) for 30-45 minutes. Bake as directed (they make take slightly longer to bake).


I shared these with my neighbours who declared they were 'amazing', 'beautiful' and 'yummy'. High praise indeed. Meanwhile I haven't quite worked out how best to use all those passionfruit still lurking in the fruit bowl. Hopefully I'll have sorted something out next time we meet. 
 
Until then,

Bye for now,

Jillian
PRINT RECIPE

rhubarb crumble cake

15 Aug 2021


I'm slowly working my way through 'Dessert Person' by Claire Saffitz. As I love rhubarb and it's in season here, I couldn't go past the rhubarb cake recipe. Originally I was going to make this into an upside down rhubarb cake but rethought my plan and instead went with a crumble topping. I took quite a few liberties with Claire's recipe. I made a half size cake; stewed the rhubarb in the microwave and added the bicarb soda in with the flour instead of the puree because the rhubarb puree was such a pretty colour I didn't want it to turn a murky grey. The rhubarb tinted the cake batter such a pretty pink.

I already have a rhubarb crumble cake recipe on my blog, a butter cake studded with diced rhubarb, so I was interested to see how this recipe compared.

I topped the cake with some rhubarb pieces and an oaty crumble, then finished it off with a with a dusting of icing sugar and on the side, some oven roasted rhubarb .
Here's the recipe for you which makes a 17 cm cake. If you'd like to make a 23 cm/9 inch cake just double all the ingredients but the bake time will stay the same. For all my recipes I use a 250 ml cup, a 20 ml tablespoon, unsalted butter and 60 g eggs. My oven is a conventional oven so if you have a fan-forced oven you may need to reduce the temperature by 20°C.  

Rhubarb Crumble Cake – makes a 17 cm cake
Crumble 
50g unsalted butter at room temperature
60g (¼ cup) raw sugar
50g (⅓ cup) plain flour
25g (¼ cup) rolled oats
Pinch cinnamon and salt 
 
Cake  
225g (8 oz) rhubarb stalks, chopped into 1 cm pieces
135g plain flour (1 scant cup)
1¼ tsp baking powder
¼ tsp bicarb soda
Pinch salt
60g unsalted butter (2 oz) melted and cooled
125g (½ cup) caster sugar
1 tsp vanilla extract
1 tsp finely grated orange rind
1 egg
2-3 tbs plain full fat Greek yoghurt
Raw sugar and icing sugar for dusting
 
Crumble
Make the crumble by rubbing the flour and butter together then stirring in the sugar, oats, cinnamon and salt to make large crumbs. Place in the fridge until needed. 
 
Preparation
Preheat the oven to 180°C, conventional. Grease and line the base of a 17 cm cake tin with baking paper. Grease the baking paper and sprinkle generously with raw sugar to coat the base and sides of the tin. Place in the fridge until needed. 
 
Cake
Measure out the rhubarb. You’ll need 125g for the puree, 60g for the cake batter and 40g to top the cake. Place the 125g of rhubarb into a microwave safe container with a tbs of water then cover and microwave on high for 3 minutes. The rhubarb should be soft by this stage. Allow to cool completely in the covered bowl, then mash the rhubarb with a fork to make a puree. You could also cook the rhubarb in a saucepan on the stove. 
 
Sift the dry ingredients into a medium bowl. In a separate bowl, vigorously mix together the cooled butter, sugar, vanilla, orange rind and egg until the mixture is thick and light, about 1 minute. Add the yoghurt and the rhubarb puree and mix until smooth.
 
Scrape the rhubarb mixture into the bowl with the flour and whisk until the batter is evenly mixed. Fold in the reserved 60g of rhubarb and spoon into the prepared tin. Level the top of the cake batter and then sprinkle with the remaining 40g of chopped rhubarb. Strew the crumble over the rhubarb pieces until they’re mostly covered.
 
Place into the oven and bake for 80-90 minutes or until the crumble is golden brown and a skewer inserted into the cake comes out clean. Cover the top of the cake with foil if it is browning too much while baking. Err on the side of baking the cake more rather than less. It’s a moist cake and under baking it even slightly could cause the cake to fall a bit as it cools.
 
Let the cake cool in the pan for 20 minutes before unmoulding. Let the cake cool completely on a wire rack before serving topped with a dusting of icing sugar. Store well wrapped in an airtight container. 
The rhubarb is front and centre in this recipe but it's very subtle in the baked cake. I think precooking the rhubarb tames it's flavour a little and I'm wondering what the cake would taste like with a bit more fresh rhubarb and a bit less cooked rhubarb. 
 
I shared the cake with my neighbours and here is Dave's review of the cake. 'Cake was yummy, thank you! And exactly the sort of cake I like... not too rich and creamy. Tasty as hell'. The cake tastes even better 1 or 2 days after baking.
 
See you all again next week with some more baking from my kitchen.
 
Bye for now,
 
Jillian
PRINT RECIPE

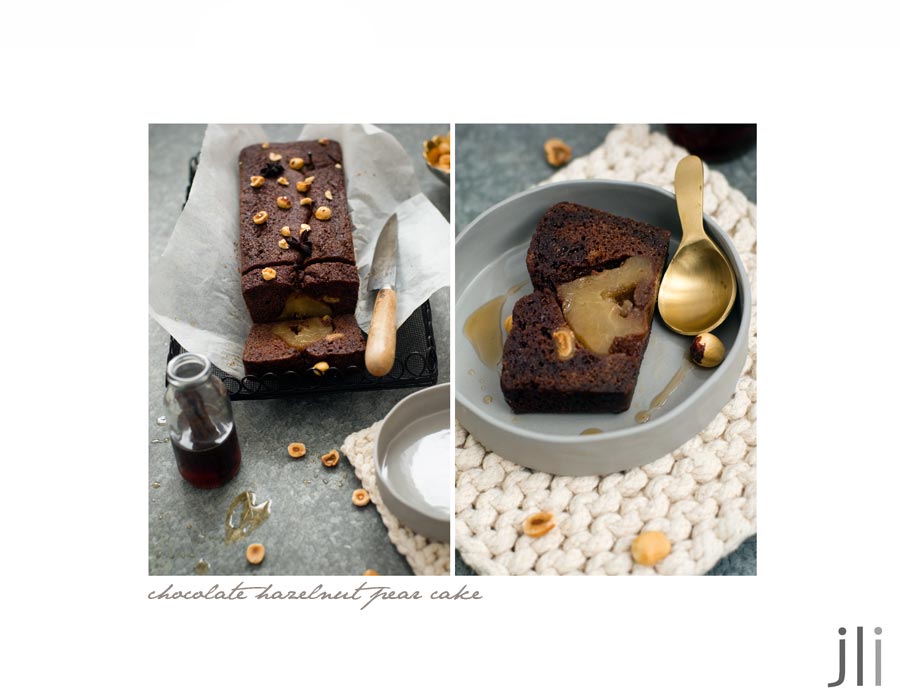
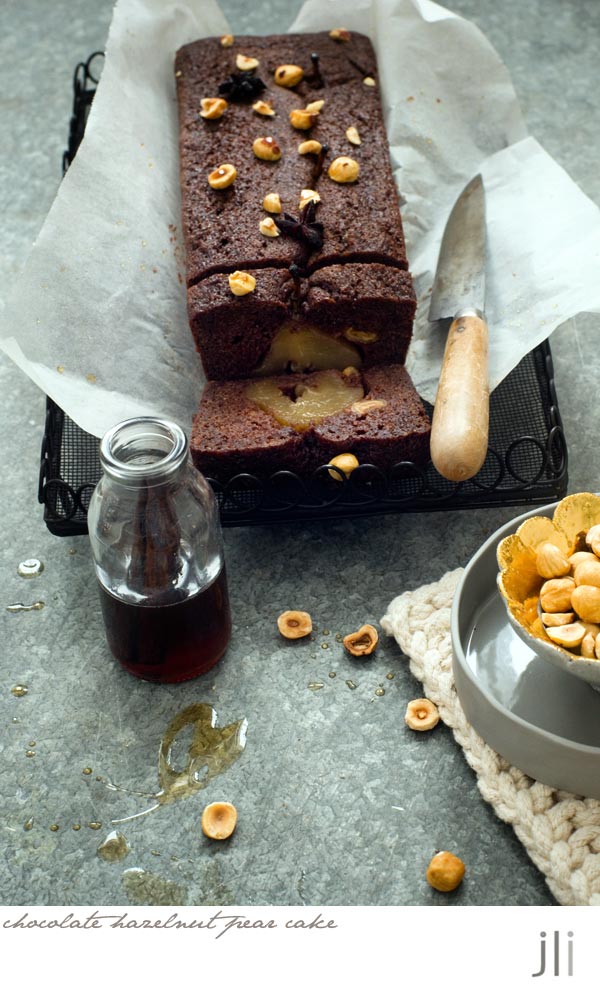
chocolate hazelnut pear cake

7 Aug 2021

I saw a recipe for a chocolate and hazelnut upside down pear cake in the Easter Coles magazine. I bookmarked the recipe and waited until pear season rolled around then I reworked the recipe a little to make this chocolate hazelnut pear loaf cake.
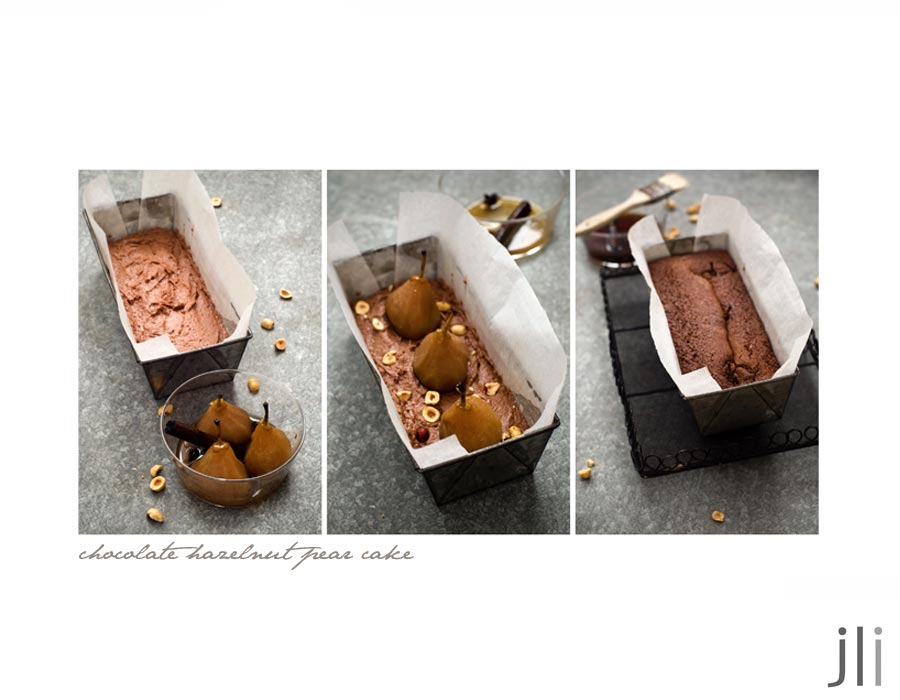
You start the process by poaching whole pears in a cinnamon and star anise spiced sugar syrup. I poached a few tiny corella pears and as I don't like to find any surprises in my cakes, I cored the pears first using a small knife and a long handled teaspoon.
The original recipe added cream to the poaching liquid to make a caramel sauce but I thought it tasted very nice the way it was and just reduced the poaching liquid to create a pear flavoured syrup. You can poach the pears some time in advance as they keep well in the fridge.
I topped the cake with a few hazelnut halves but they sank during the baking process so I probably wouldn't do that again.
As the cake batter melts during the baking process the whole pears will keel over a little. At the 30 minute mark you can reposition the pears and they'll stay put for the rest of the baking process.
Here's the recipe for you which makes an 8 x 22 cm loaf cake, measured from the base. For all my recipes I use a 250ml cup and a 20 ml tablespoon, unsalted butter and 60g eggs. My oven is a conventional gas oven so if your oven is fan forced you may need to reduce the oven temperature by 20°C. 
 
Chocolate pear hazelnut loaf cake
Ingredients   
½ cup (75g) plain flour 
Scant ¼ cup (35g) self-raising flour
2 tbs (16g) cocoa powder
Pinch salt
¼ tsp bicarb soda 
cup (40g) hazelnut meal
125 g room temperature unsalted butter, chopped 
cup brown sugar
1 tsp vanilla extract
2 eggs
¼ cup full fat yoghurt
Chopped hazelnuts, toasted, to serve
Double cream, optional 
 
Caramel pears 
3 small firm pears, peeled and cored, stems left intact
½ cup brown sugar
1 cinnamon stick or quill
1 whole star anise
1 tsp vanilla bean paste

Caramel pears
Trim the end of the pears so they will sit flat. Place the pears and sugar in a medium saucepan. Pour over enough water to cover the pears. Add the cinnamon, star anise and vanilla. Place over high heat and bring to the boil. Reduce heat to low then cover the pears with a disc of baking paper to help keep pears submerged in the poaching liquid. Simmer for 45 minutes to 1 hour or until the interior of the pears are tender when tested with the tip of a knife.

Carefully use a metal spoon to transfer the pears to a heatproof bowl. Bring syrup in the pan to the boil over high heat and cook until the sauce reduces by three-quarters. Set aside for 10 minutes to cool then transfer the pear caramel to a heatproof bowl and place in the fridge for 1 hour to chill.

Cake
Preheat oven to 170°C, conventional. Grease and line the base and sides of a small loaf pan with baking paper. Sift the combined flour, cocoa powder, salt and bicarbonate of soda into a small bowl then stir through the hazelnut meal. Set to one side. Cream the butter, sugar and vanilla in a large bowl until pale and creamy. Add the eggs, 1 at a time, beating well after each addition. Add the hazelnut mixture to the batter and stir to combine. Add the yoghurt and stir again until fully combined. 
 
Spoon the mixture into the pan and smooth the surface. Carefully place the pears into the batter, evenly spaced. Bake for 30 minutes in the preheated 170° C oven then reposition the pears which will have shifted in the batter. Bake for a further 30 minutes or until a skewer inserted in the centre comes out clean. Set aside in the pan for 30 minutes to cool slightly before turning out onto a rack to completely cool.
Slice the cake and drizzle the slice with some of the pear caramel. Sprinkle with the hazelnuts and serve with a dollop cream if desired. 

I shared the cake with the neighbours and they gave it the thumbs up. The pear caramel sauce was amazing.

See you all again next week with some more baking from my kitchen.

Bye for now,
 
Jillian
 

PRINT RECIPE

zucchini chilli and gruyere buns

4 Aug 2021

Last weekend my very kind next door neighbour brought over a container of roast tomato and lentil soup. I had the soup for lunch and it went perfectly with the buns I'd just made whilst putting a bread machine through it's paces.


I made a batch of zucchini, chilli and gruyere buns, which were very slightly adapted from a Nadine Ingram recipe from her Flour and Stone cookbook.

I only made half a batch but here's the full recipe for you which makes 16. For all my recipes I use a 250 ml cup, a 20 ml tablespoon, unsalted butter and 60 g eggs. My oven is a conventional oven so if you have a fan-forced oven you may need to reduce the temperature by 20°C.
 
Ingredients 
300 g strong bakers flour
100 g plain flour, plus extra for dusting
2 tsp caster sugar
2 tsp salt
1 tbsp olive oil
300 ml tepid water
1 tbsp milk
10 g fresh yeast (or 5 g dried yeast)
 
Filling
1 long red chilli, finely chopped 
1 medium zucchini, grated
60 g grated gruyere cheese
 
Method 
Place all the ingredients into the bowl of an electric mixer fitted with a dough hook. Mix on low speed for a couple of minutes until it begins to form a ball, then increase the speed to medium and mix for 5 minutes to develop the protein and give your dough structure. At this stage the dough will start to form a ball around the dough hook, peeling away from the sides of the bowl. Transfer the dough, which will be a little sticky, to a lightly oiled bowl, cover it with plastic film or a tea towel and place in a warm place to prove for 45 minutes or until it has doubled in volume.

Once the dough is ready knock back the dough by turning it out onto a lightly floured work surface, then gently pat it into 30 cm x 20 cm rectangle. Fold the dough in half, then in half again (as if you are folding a piece of paper). Return it to a greased bowl, then cover and prove for a further 30 minutes or until doubled in volume.

Turn out the dough onto a floured surface once more, patting it gently with your hands to form the same rectangle as before. Sprinkle the chilli evenly over two-thirds of the dough, leaving the remaining third bare. Squeeze any moisture out of the zucchini and spread it over the chilli, followed by the cheese and a little salt and pepper. Fold the bare portion of dough over half the cheese mixture, and then over again to completely envelop the filling.


Turn the dough so the seam is parallel to your body, using extra flour on the bench to stop it sticking and then pat it out to a 30 cm x 15 cm rectangle. Dust the top of the dough with a little flour then cover with a tea towel and rest on the bench for 10 minutes.

Preheat the oven to 190°C conventional and line a baking sheet with baking paper. Using a dough cutter or a large knife cut the dough in half lengthways then cut across the two rows to form 16 even square buns. Place the buns on the prepared baking sheet, cover with a tea towel and prove one last time for 15 minutes or until they have doubled in volume.
 

Bake the buns for 25–30 minutes or until golden, then remove them from the oven and cool on the tray. Nice toasted topped with a little butter.

Delicious soup and delicious buns. I ate 3 with my bowl of soup! 
 
See you all again next week with some more baking from my kitchen.
 
Bye for now,
 
Jillian

PRINT RECIPE

apple and blackberry pudding

2 Aug 2021

It's winter here and Sydney and we're still in lock down so I've been spending a lot of time in my kitchen. I was browsing through my copy of A Year of Simple Family Food by Julia Busuttil Nishimura and came across a recipe for an apple and blackberry pudding. It looked similar to an Eve's pudding made with stewed apple, something I'd made many years before.


I always have Granny Smith apples in the fruit bowl so apart from blackberries I had everything else I needed to make the pudding. Fresh blackberries are ridiculously expensive in Sydney but frozen berries are not, so I bought some frozen berries and made the pudding.


My oven is quite a slow oven and when I followed the recipe the apples were only partially cooked after 45 minutes. I put the pudding back into the oven and even after an hour the apples were still slightly under-cooked.


I went back to the drawing board, tweaked the recipe a little and came up with this version in which you precook the apples. 
 

Here's the recipe for you which serves 4. For all my recipes I use a 250ml cup and a 20 ml tablespoon, unsalted butter and 60g eggs. My oven is a conventional gas oven so if your oven is fan forced you may need to reduce the oven temperature by 20°C.
 
 
Apple and Blackberry Pudding - inspired by a Julia Busuttil Nishimura recipe
Filling
450g granny smith apples, peeled, cored and cut into thin slices
50g raw sugar
30 mls lemon juice
½ tsp vanilla extract
125g fresh or frozen blackberries 
 
Pudding mixture
50g unsalted butter, softened plus extra for greasing
50g raw sugar
½ tsp vanilla extract
½ tsp finely grated lemon rind
1 egg, lightly beaten
¼ cup full-cream milk or yoghurt
75g (½ cup) self-raising flour sifted with a pinch of salt
 
Cinnamon sugar topping
2 tsp raw sugar
¼ tsp ground cinnamon
 
To serve
Pouring cream

Method
Preheat the oven to 180°C, conventional. Grease a 20cm round dish with butter.
 
Combine the apple, sugar, lemon juice and vanilla in a microwave safe bowl and cook on high for 5 minutes or until softened. You can also cook the apples in a saucepan for the same time. Cool the apple mixture before stirring in the blackberries which can be used frozen. Spoon the fruit into the prepared dish.
 
To make the pudding mixture, cream the butter, sugar vanilla and lemon rind in a bowl until pale and fluffy. Add the beaten egg, mixing until everything is well incorporated. Stir in the flour and milk alternating in thirds, gently mixing until the batter is smooth.
 
Spread the batter over the top of the fruit, smoothing the top with a spatula. Combine the sugar and cinnamon in a small bowl and sprinkle the cinnamon sugar mixture over the top of the pudding.
 
Bake for 45 minutes or until the top springs back when touched and the fruit is soft. If the top is browning too quickly, cover with foil.


So easy to make and delicious as well. I think its best served warm from the oven topped with a drizzle of cream.
 
See you all again next week with some more baking from my kitchen.
 
Bye for now,
 
Jillian
PRINT RECIPE
© DELICIOUS BITES • Theme by Maira G.