SLIDER

louise cake with apricots and coconut

27 Nov 2023


This is the fourth time I've made
the Louise cake from Sweet by Yotam Ottolanghi and Helen Goh. The orginal recipe was made with plums and coconut but it's a bit early for plums and at $14.99/kilo, they were too expensive. 
Instead I picked up some battered apricots which were on special at the fruit shop and used them instead of the the plums. I've also made the cake with rhubarb which was absolutely delicious. 


I wasn't sure if the apricot version would deliver, but it did in spades. The apricots were just delicious in the cake, which I shared with my neighbours.


Here's the recipe for you which make a 17cm round cake. If you'd like to make a larger version click on the link above for the quantities. For all my recipes I use a 250ml cup and a 20 ml tablespoon, unsalted butter and 60g eggs. My oven is a conventional gas oven so if your oven is fan forced you may need to reduce the oven temperature by 20°C.

Louise cake with apricots
85g unsalted butter, at room temperature, cut into 2cm cubes
65g caster sugar
1½ tsp finely grated lemon zest 
2 large egg yolks
85g plain flour
1 tsp baking powder
a pinch of salt
15g desiccated coconut
60ml full cream milk
1 tsp vanilla extract
3 apricots, halved deseeded then quartered

Meringue
40g flaked almonds
95g egg whites (from 3-4 eggs)
pinch salt
125g caster sugar
3/4 tsp vanilla extract
3/4 tsp white wine vinegar
3/4  tsp cornflour

Method
Preheat the oven to 170°C, conventional. Spread out the flaked almonds for the meringue on a baking tray and roast for 10 minutes, until they are a light golden brown. Remove from the oven and set aside to cool.

Increase the oven temperature to 180°C conventional. Line the base and sides of a high-sided 17cm round tin (with a removable base) with baking paper.

Place the butter, sugar and lemon zest in the bowl of an electric mixer with the paddle attachment in place. Beat on a medium-high speed, until light and creamy. Add the egg yolks, one at a time, and beat until combined. Sift the flour, baking powder and salt together into a bowl. Add the coconut and stir to combine. With the machine on a low speed, gradually add the dry ingredients to the butter mix, alternating with the milk and vanilla. 

Scrape the batter into the prepared tin – it will only rise about a fifth of the way up the sides – and smooth the top evenly. Place in the oven and cook for 25 minutes or until the cake is fully cooked and a skewer inserted into the centre comes out clean.

When the cake is cooked, remove it from the oven and turn the temperature up to 200°C conventional. Gently lay the apricot slices on top of the cake.


Meringue
Place the egg whites and salt in a clean bowl of an electric mixer with the whisk attachment in place. Beat on a medium-high speed for about 1 minute until soft peaks form. Add the sugar, a tablespoon at a time, and continue to whisk on a high speed until the egg whites are stiff and glossy. Add the vanilla, vinegar and cornflour and whisk again until combined. Finally, fold in the toasted flaked almonds.


Scrape the meringue into the cake tin, on top of the fruit, and spread out evenly over the fruit. Swirl the meringue around so you get rough waves and peaks, then place in the oven. Immediately lower the oven temperature to 180°C conventional and bake for 35 minutes, or until the meringue has formed a hard crust and is just beginning to brown. 


Remove from the oven and allow to cool in the cake tin for at least 30 minutes before pushing up the removable base to release the cake. Peel away the parchment paper, place on a platter, and serve.


I hope you get the chance to make my apricot version of the Louise cake. If it's not apricot season where you live, I'm sure well drained tinned apricots would work just as well as the fresh.

See you all again next week with some more baking from my kitchen.

Bye for now,

Jillian

PRINT RECIPE

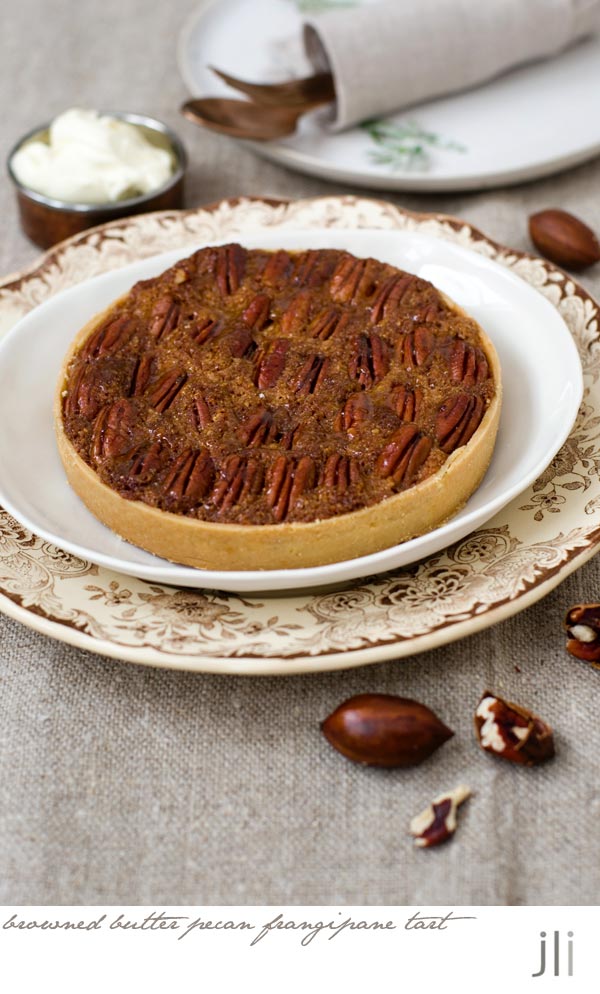
browned butter pecan frangipane tart

20 Nov 2023


My household is a small one so a 23cm tart is way too big, even when I share it with my neighbours and workmates. I've long wanted a shallow 15.5cm tart tin as its exactly half the dimensions of a 23 cm tin. When I was in Paris I made a beeline to A. Simon and purchased a De Buyer perforated tart tin, which is impossible to find in Sydney. Since my return, I've been looking for a reason to use the tin, then suddenly realised that Thanksgiving is upon us. 


Thanksgiving isn't a thing in Australia but I used to write a food column for a US based blog so got into the habit of making pies and tarts for Thanksgiving. This tart was 100% inspired by Claire Saffitz's Thanksgiving menu which I found on the 
NYT Cooking youtube channel.

I love frangipane tarts so I used Claire's tart as inspiration but adapted my own recipe to come up with this browned butter pecan frangipane tart. I thought the filling might be a bit overwhelming if it was made entirely from pecans so I used half almond meal and half toasted pecan meal. I toasted the pecans for about 8 minutes in a 190°C, conventional oven, then ground them in my mini food processor.


Here's the recipe for you which makes a 15.5 cm tart. For all my recipes I use a 250ml cup and a 20 ml tablespoon, unsalted butter and 60g eggs. My oven is a conventional gas oven so if your oven is fan forced you may need to reduce the oven temperature by 20°C. If you'd like to make a 23cm tart, the quantity of pastry in the recipe is sufficient to make a 23cm shell. For the filling, use a whole egg, and double the rest of the filling ingredients. The bake time will stay the same.

Browned butter pecan frangipane tart – makes a 15.5 cm tart 
Pastry
60g cold unsalted butter
1 cup plain flour
pinch of salt
2 tbs cold water

Frangipane
65g unsalted butter
50g raw caster sugar
1 tsp vanilla extract 
1 egg yolk
50g almond or toasted pecan meal or a mixture of both
pinch salt
2 tsp flour
1½ tsp rum 

Topping
75g whole pecans
1 tbs maple syrup
flaky sea salt

To serve
cream
candied rosemary leaves (optional)

Pastry
You’ll only need about half of the pastry dough to make a 15.5 cm tart. The pastry freezes well so just wrap the remaining pastry in plastic wrap and store in the freezer. 

Combine the butter, flour and salt in a food processor and process a few times until the butter is coarsely chopped. Add sufficient water and process just until a dough starts to form around the blade. Wrap in plastic and refrigerate the pastry for an hour before rolling out thinly - 3mm thick - on a floured benchtop. Line a greased 15.5 cm flan tin with the pastry then return to the fridge for another 30 minutes while making the filling. Trim excess pastry.


Frangipane
Chop the butter and place in a microwave safe bowl. Cover and cook on high for about 4 minutes until the butter has browned and smells nutty. Set aside to cool. You can also do this step in a small saucepan on the stove. You will need 50g of the cooled brown butter for this recipe.

In a small bowl, mix together the still liquid browned butter, the sugar and vanilla. Add the egg yolk followed by the nut meal, salt, flour and rum. You should end up with a very soft paste. Refrigerate for about 30 minutes to firm the mixture.

Tart
Preheat the oven to 190°C, conventional. Fill the pastry shell with the frangipane mixture stopping about ½ cm from the top, then level the surface with a knife. Arrange the pecans decoratively over the frangipane. Brush the maple syrup over the pecans then sprinkle with a few sea salt flakes. 

Bake the tart on the centre rack of the preheated oven for 35-45 minutes or until the frangipane filling has puffed and is golden brown. Remove from the oven, place on a rack and let the tart cool completely before serving. 


If you'd like your tart shiny, then glaze again with maple syrup just before serving. Serve with cream.


I decided to gild the lily a little and topped the tart with a sprig of candied rosemary left over from another project. Just a warning, this is not a very sweet dessert, in fact it's almost savoury, so you might want to increase the sugar in the filling to 75g.


The finished tart looks pretty impressive but it's easy to make. 

Happy Thanksgiving to my US readers and see you all again next week with some more baking from my kitchen. 

Bye for now, 

 Jillian
PRINT RECIPE

lemon meringue pie bars

12 Nov 2023


When I opened my copy of 'Love is a Pink Cake' by Claire Ptak and saw a photo of the lemon meringue pie bars, I knew I had to make them. I've been making lemon squares for at least 20 years and love lemon meringue pie, so this recipe seemed to combine the best of both worlds. My friend Liane, who passed away last year, loved my tart lemon squares and I just know she would have loved this lemon meringue version.


This is not the original recipe, which you can find hereI made a half batch of the lemon meringue bars which I baked in a 7 inch square tin. I used my own tried and true shortbread base and cut down the sugar in the filling substantially because I wanted the filling to be quite tart. I also lined the base with lightly greased non-stick foil rather than baking paper and while it worked well, it retained heat so the edges were a little too brown. I just trimmed the edges a little but next time, I'd reduce the bake time by 5 minutes or so.


Here's my version of Claire's recipe for lemon merigue pie bars which yields 8 bars. For all my recipes I use a 250ml cup and a 20 ml tablespoon, unsalted butter and 60g eggs. My oven is a conventional gas oven so if your oven is fan forced you may need to reduce the oven temperature by 20°C.

Lemon meringue pie bars - makes 8 
Shortbread base 
150g plain flour
40g icing sugar
pinch salt
1/2 tsp vanilla extract
110g unsalted butter, cold, cut into cubes

Lemon filling
25g plain flour 
¾ tsp baking powder
150g caster sugar
2 eggs 
2 lemons, zested and juiced (you need 85g lemon juice)

Meringue topping
2 egg whites
100g caster sugar 
3 tsp golden syrup
Pinch of salt 
3 tsp vanilla extract

Method
Preheat the oven to 190°C, conventional and grease and line a 7x7in tin with baking paper or non-stick foil. Do not cut the corners of the paper to fit the tray, just line as tightly as possible so that the paper comes above the edge of the tray on all sides. If using foil, lightly grease the foil.


Put the flour, icing sugar and salt into a food processor and pulse briefly to combine, then add the vanilla and the cubed butter and pulse until it comes together in a ball. Press the mixture evenly into the prepared baking tray, then bake for 20 minutes or until lightly golden.


To make the filling, put the flour, baking powder and caster sugar into a large bowl and use a whisk to combine. Add the eggs and lemon juice and whisk again. Strain the mixture into a clean bowl and stir in the lemon zest.


As soon as the base is baked, remove from the oven, carefully pour the filling over the base and return to the oven. Immediately lower the temperature to 170°C, conventional and bake for about 30 minutes, or until the top is set; it should be slightly firm and lightly golden. Remove from the oven and allow the slice to cool completely.

Meanwhile, put all the ingredients for the meringue topping into a heatproof bowl and place over a saucepan of boiling water (do not let the water touch the bottom of the bowl or it will cook the egg whites). Whisk continuously until the sugar dissolves and the mixture is very warm to the touch. If using a sugar thermometer, whisk continuously for 2 minutes, or until it reads 70-75°C, whichever comes first. Transfer to the bowl of a stand mixer fitted with a whisk attachment to whip the mixture into stiff, glossy peaks.


Put the marshmallow into a piping bag fitted with your favourite nozzle. Pipe or spoon the meringue onto the cooled lemon filling. You can either cover the entire tray or slice into 8 bars first and then pipe each one individually, as we do at the bakery. If you have a blowtorch, torch the top of the meringue, or if you're brave you can pop it under the grill for 30 seconds or so to get the same effect.


These are best enjoyed on the same day but will keep at room temperature for 24 hours.


As expected these were very good - melting shortbread base, tart lemon filling and fluffy meringue. If you look closely, you'll see the meringue has split a bit. This has nothing to do with the recipe but with the cook whose arms gave out after 7 minutes of whipping the meringue using electric hand beaters. I reckon the meringue needed 10-15 minutes of whipping to be stable. Memo to self - remember to use a stand mixer next time.

See you all again next week with some more baking from my kitchen.

Bye for now,

Jillian


PRINT RECIPE

blood orange and chocolate marble cake

6 Nov 2023


I know it's been a while since I posted a recipe but I've barely been in Sydney since I returned from my trip. Behind the scenes, I've made quite a few marble cakes, looking for the perfect recipe. Each version has been an improvement on the one before, but I hadn't really found a 'winner'.


When I returned from my overseas trip I found 3 small blood oranges in my fridge. Now I do not like to waste anything so I wondered if I could incorporate blood oranges into the marble cake recipe. 
This iteration is an adaptation of the  Neapolitan Pound Cake recipe from Sweet but I made it a blood orange version. Rather than pink coloured cake, I flavoured the cake with blood orange rind and some pureed blood orange marmalade. 


The cake didn't scream orange so I added just a few drops of red food colouring to boost the colour and then the icing was coloured and flavoured by the addition of some blood orange juice. For decoration I used some of the dried blood orange slices I made last year for Christmas but they're really not necessary.


Here's the recipe for you which makes a large bundt cake and it is adapted from Sweet by Ottolenghi and Helen Goh Cake. For all my recipes I use a 250ml cup and a 20 ml tablespoon, unsalted butter and 60g eggs. My oven is a conventional gas oven so if your oven is fan forced you may need to reduce the oven temperature by 20°C.


Blood orange and chocolate marble cake adapted from Sweet
Ingredients
1 and 1/2 tbs blood orange marmalade 
75ml milk at room temperature
4 large eggs, at room temperature
2 tsp vanilla extract
165g self-raising flour
85g plain flour, plus extra for dusting
¼ tsp salt
250g caster sugar
250g unsalted butter, soft but not oily, diced, plus extra for greasing
25ml boiling water 
2 tbsp Dutch-processed cocoa powder
2 tsp grated blood orange rind
A drop or two of red food colouring

For the icing
15g unsalted butter, softened 
150g icing sugar, sifted
20-30 mls blood orange juice 
pinch salt

To decorate (optional)
Dried blood orange slices

Method
Heat the oven to 180⁰C, conventional. Grease and flour a 23cm bundt tin and place in the fridge until needed.

In a small food processor blitz the marmalade to form a puree. You may need 1-2 tsp of water to loosen the mixture. Set aside.

For the cake, put the milk, eggs and vanilla extract in a medium bowl and whisk lightly, just to combine. Sift the flours and salt into the bowl of an electric mixer with the paddle attachment in place, then add the sugar and mix on a low speed for 30 seconds. Add the butter and half the egg mixture then mix until well incorporated. Increase the speed to medium and beat for one minute. 

Scrape down the sides of the bowl, then add the remaining egg mixture in two batches, making sure the first batch is fully incorporated before adding the second. Scrape down the sides of the bowl again, then divide the batter equally between three small bowls. You should have about 330g of batter in each bowl.

Place the hot water in a small bowl with the cocoa powder. Stir to make a smooth and very thick paste, then mix into one of the bowls of cake batter. To the second bowl of cake batter, add the orange puree, the orange rind and tint with the food colouring, adding a drop or two at a time until it’s the colour you want. Leave the third bowl of batter as it is.

Spoon the batter into the prepared tin in six alternate blocks, two of each colour, then use a skewer or knife to make one zigzag-shaped swirl through the mix, to create a marble effect (don’t be tempted to overdo the swirling, or you’ll lose the marbling).


Place on the centre rack of the oven and bake for 40-45 minutes, until a skewer comes out clean, then remove and set aside for 10 minutes. Allow to cool completely before icing.


For the icing, combine the icing sugar, softened butter and salt in a small bowl. Add enough of the orange juice to make a thick but pourable icing. Spoon over the cooled cake, so the icing drips unevenly down the sides. Leave to set for a few minutes, and serve. If you like, you can top the cake with some dehydrated blood orange slices.


I shared this cake with the twins and they were so-so about it (I suspect they'd have preferred it if it was coloured pink) but it was a hit with the adults. This is a very nice cake and it's definitely the best version of the 3 marble cakes I've made to date, as orange and chocolate are a natural pairing.


See you all again next week with some more baking from my kitchen.

Bye for now,

Jillian
PRINT RECIPE
© DELICIOUS BITES • Theme by Maira G.